
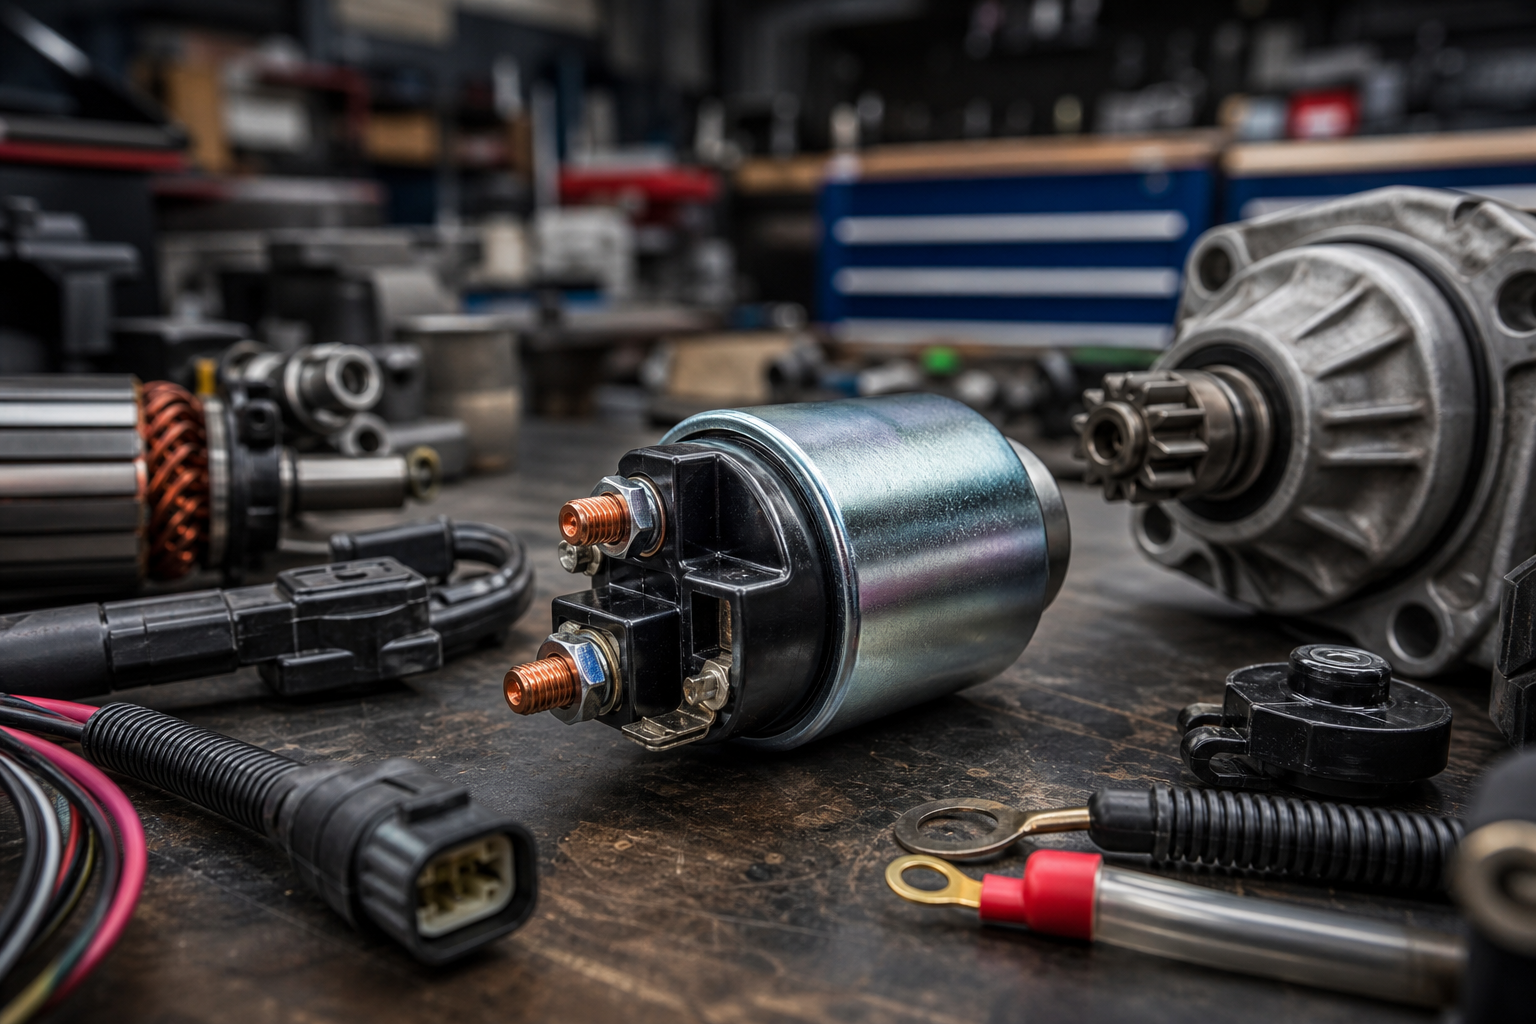
When an engine will not crank, it is easy to blame the starter solenoid. However, a bad battery, corroded cable, poor engine ground, faulty starter relay, damaged control wire, or failed starter motor can create almost the same symptoms.
That is why the best way to test a starter solenoid is to diagnose the entire starting circuit in the correct order rather than replacing parts based only on a clicking sound.
In this guide, you will learn how to test a starter solenoid with a multimeter, how to perform a voltage-drop test, how to interpret different clicking symptoms, how to bench-test a starter solenoid, and how to distinguish a bad solenoid from a battery, wiring, relay, or starter motor problem.
These basic diagnostic principles apply to cars, trucks, tractors, excavators, skid steers, forklifts, generators, wheel loaders, and other machinery. However, heavy equipment may use either 12V or 24V starting systems, so always confirm the equipment specification before interpreting voltage readings.
Quick Answer: To test a starter solenoid, first verify that the battery and cable connections are healthy. Check for battery voltage at the solenoid's main B+ terminal. Then measure the small S or start terminal while the key is held in the START position. If the solenoid receives the correct start signal but does not engage or fails to deliver power to the starter motor, test the output terminal and perform a voltage-drop test across the solenoid contacts. Excessive voltage drop or no output despite a proper start signal usually points to a faulty solenoid.
What Does a Starter Solenoid Do?
A starter solenoid is an electromagnetic switch used in the engine starting system.
When you turn the ignition key or press the start button, a relatively small electrical current energizes the solenoid coil. The resulting magnetic field moves an internal plunger.
On many starter-mounted designs, that movement performs two jobs:
- It moves the starter drive or pinion toward the engine flywheel or flexplate.
- It closes a pair of heavy electrical contacts, allowing high battery current to flow to the starter motor.
This distinction is important when diagnosing a no-crank problem.
A solenoid may make a strong click because its coil and plunger are operating, yet its internal high-current contacts can still be burned, worn, or resistive. In that situation, hearing the solenoid click does not prove that the solenoid is good.
Some vehicles and machines use a starter-mounted solenoid, while others may also use a separate starter relay or remote solenoid. Always confirm the starting circuit layout for the specific vehicle or machine you are working on.
How to Tell If a Starter Solenoid Is Bad
Starter solenoid symptoms can provide useful clues, but they should be used as the beginning of diagnosis rather than proof that the solenoid needs replacement.
| Symptom | Possible Cause |
|---|---|
| One strong click but engine does not crank | Solenoid contacts, starter motor, battery cable, ground connection, or weak battery |
| Rapid repeated clicking | Low battery voltage, loose terminal, corroded cable, or high-resistance connection |
| No click at all | No start signal, blown fuse, starter relay, ignition switch, neutral safety switch, wiring problem, or failed solenoid coil |
| Engine starts intermittently | Worn solenoid contacts, poor connection, control-circuit fault, or worn starter |
| Starter motor spins but engine does not turn | Starter drive or pinion engagement problem |
| Starter remains engaged after engine starts | Sticking solenoid, mechanical fault, relay/control problem, or damaged ignition circuit |
| Battery cable or starter terminal becomes hot | Loose connection or excessive electrical resistance |
| Clicking becomes worse when the machine is hot | Heat-related resistance, worn starter, worn solenoid contacts, or cable problem |
Single Click vs. Rapid Clicking
These two symptoms are frequently confused.
One strong click normally means the solenoid has received a start command and at least part of the solenoid mechanism has moved. The next step is to determine whether battery current is actually passing through the solenoid to the starter motor.
Rapid clicking usually points first toward a battery or connection problem. When voltage drops too far under load, the solenoid engages, voltage collapses, the solenoid releases, voltage recovers, and the process repeats rapidly.
For that reason, do not replace a starter solenoid simply because the starter is clicking.
Starter Solenoid Terminal Identification
Before connecting a multimeter, identify the starter and solenoid terminals.
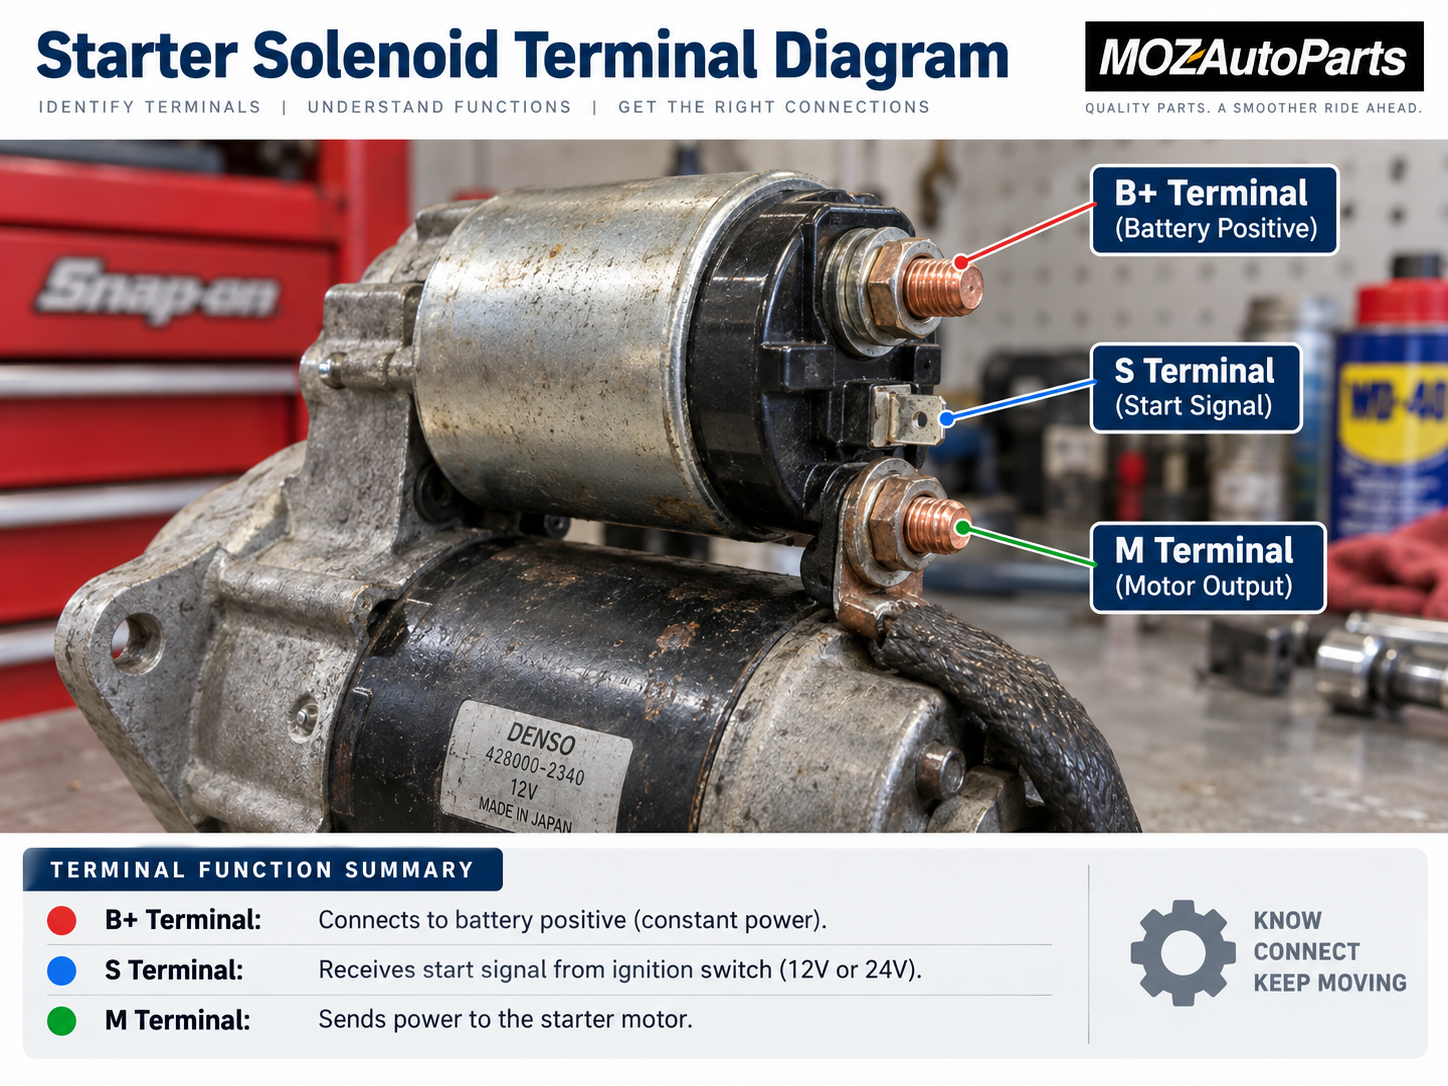
Typical starter-solenoid terminals include:
| Terminal | Common Markings | Purpose |
|---|---|---|
| Battery input | B, B+, BAT, 30 | Receives battery-positive power |
| Start signal | S, ST, KS, 50 | Receives the start command |
| Motor output | M, C | Sends high current to the starter motor |
| Starter housing | Ground | Grounds through the starter and engine block |
Not every starter uses the same labels or terminal arrangement.
Some solenoids have only one visible small control terminal. Others may have additional terminals or internal connections.
Before testing an unfamiliar starter—especially on an excavator, tractor, loader, generator, or other heavy equipment—check the wiring diagram or service manual.
Never assume terminal function based only on terminal size or location.
Tools You Will Need
For most starter solenoid tests, prepare:
- Digital multimeter
- Test light, if available
- Safety glasses
- Insulated hand tools
- Battery terminal cleaning brush
- Wiring diagram or service manual
- Assistant to operate the ignition switch
- Wheel chocks where appropriate
A digital multimeter is strongly recommended because it allows you to check not just whether voltage is present, but also whether excessive resistance exists in the starting circuit.
Safety Before Testing a Starter Solenoid
Starter systems can carry several hundred amps during cranking. Incorrect testing can create severe sparks, damaged electronics, burns, fire, or unexpected engine movement.
Before testing:
- Park the vehicle or machine securely.
- Apply the parking brake.
- Place the transmission in Park or Neutral as appropriate.
- Chock the wheels if necessary.
- Remove rings, watches, and other metal jewelry.
- Keep loose clothing away from belts, fans, and rotating components.
- Keep tools away from exposed battery-positive terminals.
- Confirm the electrical system voltage.
- Follow the manufacturer's service procedure whenever available.
An important rule is:
Voltage testing is performed on a powered circuit. Resistance and continuity testing must be performed with power removed.
Never set a multimeter to resistance or continuity mode and connect it across a live starter circuit.
For some cranking tests, technicians disable the ignition or fuel system so the engine can crank without starting. Follow the appropriate service procedure for the vehicle or machine.
Avoid prolonged cranking. Excessive starter operation can overheat the starter motor, cables, and solenoid.
How to Test a Starter Solenoid With a Multimeter
The most reliable diagnosis follows the starting circuit logically:
Battery → Battery cables → Starter B+ → Start signal → Solenoid output → Starter motor → Ground circuit
Do not skip directly to the solenoid.
Step 1: Check the Battery First
Set your multimeter to DC volts and measure directly across the battery posts.
On a conventional 12V lead-acid battery, a fully charged battery will typically measure approximately 12.6V at rest.
A battery measuring substantially below its normal fully charged voltage should be charged and tested before continuing with starter diagnosis.
Voltage will naturally decrease while the starter is cranking.
For a typical 12V lead-acid battery, approximately 9.6V at around 70°F / 21°C is commonly used as a reference during standardized load testing. Actual acceptable voltage depends on battery type, temperature, starting system, equipment manufacturer, and test conditions.
Do not use the incorrect assumption that:
“Anything below 12V while cranking means the battery is bad.”
A healthy 12V battery normally drops below 12V when subjected to starter load.
For 24V machines, do not use 12V diagnostic thresholds. Refer to the machine or battery manufacturer's specifications.
Step 2: Inspect the Battery Cables and Grounds
Before testing the solenoid itself, inspect the high-current connections.
Check:
- Positive battery terminals
- Negative battery terminals
- Positive starter cable
- Engine ground cable
- Chassis grounds
- Starter mounting surface
- Starter terminal nuts
- Ground straps between engine and chassis
Look for:
- Corrosion
- Loose terminals
- Frayed cables
- Broken strands
- Burned terminals
- Heat damage
- Green or white corrosion under cable insulation
- Oil or contamination around connections
A cable can look good externally while having severe internal corrosion.
This is one reason voltage-drop testing is often more useful than visual inspection alone.
Step 3: Check Voltage at the Starter B+ Terminal
Locate the large battery-positive terminal on the starter solenoid.
Set the multimeter to DC voltage.
Connect:
- Black probe: clean starter housing, engine block, or known good ground
- Red probe: large B+ battery terminal on the solenoid
With the engine off, the reading should be essentially the same as battery voltage.
For example, if the battery measures 12.55V but only 10.8V reaches the starter B+ terminal before cranking, there is already a serious voltage loss between the battery and starter.
Check the positive battery cable, battery terminals, disconnect switch if fitted, fusible links, and other high-current connections.
Do not condemn the solenoid until proper battery voltage reaches it.
Step 4: Test the S or Start-Signal Terminal
The S terminal is the control terminal that tells the starter solenoid to engage.
Keep the multimeter on DC volts.
Connect:
- Black probe: good engine or starter ground
- Red probe: S/start terminal
Have an assistant turn the ignition switch to START.
The terminal should receive voltage close to the system voltage while the start command is active.
If the S terminal receives the correct signal
The ignition/control circuit is probably doing its job.
If the solenoid still does not click or operate, suspect:
- Failed solenoid coil
- Internal mechanical failure
- Poor solenoid ground
- Starter assembly problem
If the S terminal receives little or no voltage
Do not replace the starter solenoid yet.
The problem may be upstream in the starting control circuit, including:
- Starter relay
- Ignition switch
- Start button
- Neutral safety switch
- Clutch safety switch
- Fuse
- Control module
- Damaged wiring
- Corroded connector
- Security/interlock system
On heavy equipment, additional start-permission switches and safety interlocks may also be present.
Step 5: Test the Solenoid Output to the Starter Motor
Next, determine whether the solenoid is actually passing battery power to the starter motor.
Locate the solenoid's motor-output terminal.
Connect:
- Black probe: good ground
- Red probe: motor-output terminal
Have an assistant turn the ignition to START.
When the solenoid is engaged, voltage at the starter-motor output should be close to the voltage available at the solenoid battery-input terminal under the same conditions.
B+ voltage good + S signal good + little/no output voltage
This strongly suggests:
- Burned solenoid contacts
- Damaged internal connection
- Mechanical solenoid failure
Output voltage good + starter does not rotate
The problem is more likely related to:
- Starter motor
- Starter brushes
- Armature
- Internal starter connection
- Engine mechanical resistance
- Poor ground circuit
At this point, testing the starter itself becomes more important than replacing the solenoid.
Step 6: Perform a Starter Solenoid Voltage-Drop Test
A voltage-drop test is one of the best ways to identify a starter solenoid with high-resistance internal contacts.
The important principle is simple:
A good closed electrical switch should have very little voltage across it.
If significant voltage appears across a closed solenoid, voltage is being lost inside the solenoid instead of reaching the starter.
How to test voltage drop across the solenoid
Set the meter to DC volts.
Place:
- One probe on the solenoid battery-input stud
- The other probe on the solenoid starter-output stud
Operate the starter.
Because both terminals should be at nearly the same voltage when the solenoid contacts are closed, the meter should display only a small voltage difference.
A large voltage reading indicates resistance across the contacts.
There is no single universal voltage-drop specification that applies to every starter and machine, so follow the OEM procedure whenever available.
As a general diagnostic principle, the entire high-current starter circuit should have very little voltage loss. If a significant share of the total loss occurs across the solenoid itself, the solenoid contacts deserve further investigation.
Step 7: Test the Positive Starter Circuit for Voltage Drop
A defective cable can imitate a bad solenoid.
To check the positive side:
Place:
- Red probe: battery positive post
- Black probe: starter B+ terminal
Crank the engine.
The meter now shows how much voltage is being lost between the battery and starter.
If the reading is excessive, move the meter probes progressively through the circuit to locate the resistance.
Possible causes include:
- Loose battery terminal
- Corroded cable
- Damaged cable
- Battery disconnect switch
- High-resistance connector
- Loose starter terminal
Do not measure only from the outside of the battery terminal clamp. Whenever possible, begin directly on the battery post so that the terminal connection itself becomes part of the test.
Step 8: Test the Starter Ground Circuit
A starter needs both a strong positive supply and a low-resistance ground path.
To test the ground side:
Place:
- One probe on the starter housing
- The other probe directly on the battery negative post
Crank the engine.
An excessive voltage reading indicates unwanted resistance somewhere in the ground path.
Inspect:
- Battery negative cable
- Engine-to-chassis ground strap
- Starter mounting surface
- Corroded ground terminals
- Loose mounting bolts
Heavy equipment is particularly vulnerable to ground issues because machines operate around water, dust, mud, vibration, oil, and corrosive environments.
A bad ground can easily be mistaken for a bad starter or solenoid.
Starter Solenoid Test Results: What Do They Mean?
Use the following table as a diagnostic shortcut.
| Test Result | Most Likely Diagnostic Direction |
|---|---|
| Battery voltage low before testing | Charge and test battery |
| Battery good but voltage low at starter B+ | Positive cable or connection problem |
| Starter B+ good but no voltage at S terminal | Starter-control circuit problem |
| S terminal receives correct voltage but solenoid does not click | Solenoid coil/mechanical fault |
| Solenoid clicks but motor terminal receives little/no voltage | Solenoid internal contacts |
| Voltage reaches starter motor but starter does not rotate | Starter motor or mechanical problem |
| Large positive-side voltage drop | Positive cable or terminal resistance |
| Large ground-side voltage drop | Ground cable, engine ground, or mounting problem |
| Rapid repeated clicking | Battery or high-resistance connection first |
| Single click but no crank | Solenoid contacts, starter, cables, grounds, or battery |
| Works cold but fails hot | Heat-related starter, solenoid, cable, or resistance problem |
| Intermittent starting | Worn contacts, wiring, relay, switch, or starter issue |
A Simple Starter Solenoid Diagnostic Flow
For a no-crank condition, follow this sequence. The flowchart below is the same diagnostic path used in the workshop: confirm battery power, then B+ at the starter, then the S-terminal start signal, then solenoid engagement, then output to the motor.
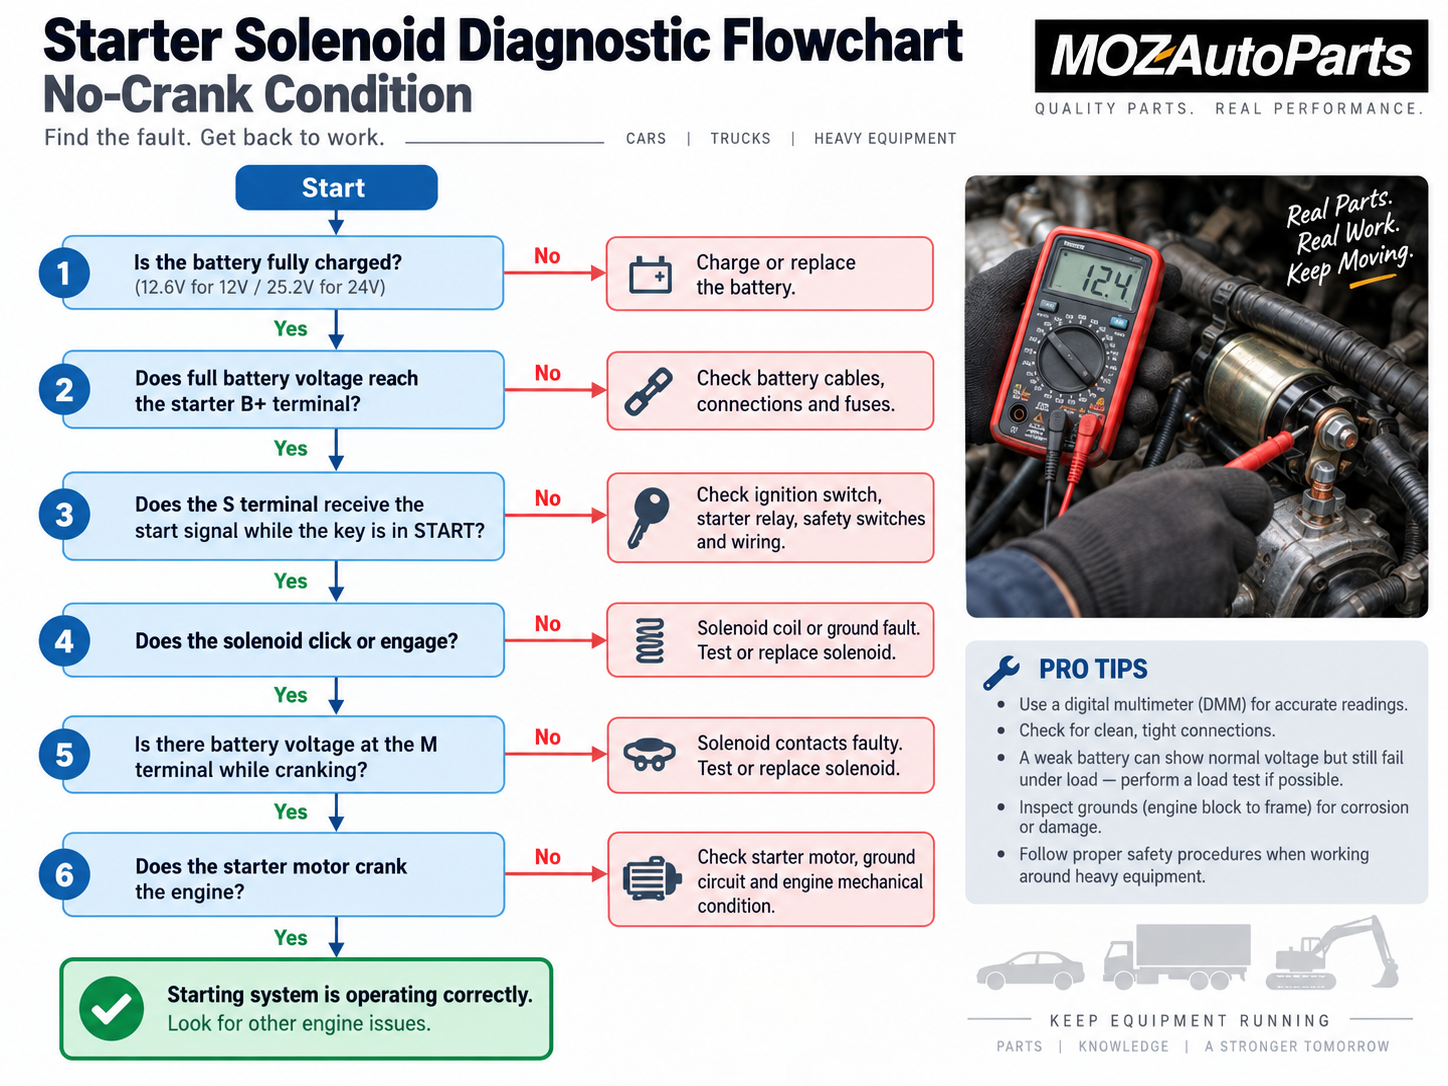
1. Does the battery have sufficient charge?
No → Charge/test the battery.
Yes → Continue.
2. Is full battery voltage reaching the starter B+ terminal?
No → Check the positive cable and connections.
Yes → Continue.
3. Does the S terminal receive the proper start signal?
No → Check the relay, switch, fuse, wiring, neutral/clutch safety circuit, and machine interlocks.
Yes → Continue.
4. Does the solenoid engage?
No → Test the solenoid coil, ground, and mechanical operation.
Yes → Continue.
5. Does voltage reach the starter-motor terminal?
No → Suspect solenoid contacts.
Yes → Continue.
6. Does the starter motor turn?
No → Test the starter motor and engine mechanical condition.
Yes → Starting circuit is operating; investigate other engine-starting systems.
This diagnostic sequence prevents unnecessary replacement of expensive components.
How to Test a Starter Solenoid Without a Multimeter
You can perform several basic checks without a multimeter, although the diagnosis will be less precise.
Listen to the Solenoid
Turn the ignition switch to START and listen carefully.
No click
Possible causes include:
- Dead battery
- No start signal
- Starter relay
- Fuse
- Ignition switch
- Safety switch
- Wiring fault
- Failed solenoid coil
Rapid clicking
Check the battery and high-current connections first.
One solid click
The solenoid is probably receiving a start command, but its main contacts, starter motor, battery, or cables may still be faulty.
A click test alone cannot determine whether the solenoid is passing enough current to the starter.
Use a Test Light
A test light can help confirm whether voltage is present.
You can check:
- Battery power at the large B+ terminal
- Start signal at the S terminal
- Power leaving the solenoid toward the starter motor
However, a test light does not reveal voltage drop as accurately as a digital multimeter.
A circuit can light a test lamp yet still have too much resistance to operate a high-current starter motor correctly.
For that reason, a multimeter and voltage-drop test remain the preferred diagnostic method.
Can You Test a Starter Solenoid With a Screwdriver?
Many online instructions recommend bridging starter terminals with a screwdriver.
Although manually bypassing starter terminals can make a starter operate on some systems, it is not the preferred diagnostic method.
Starter circuits carry extremely high current. Bridging terminals can cause:
- Severe electrical arcing
- Burns
- Damaged terminals
- Damaged vehicle electronics
- Battery damage
- Unexpected engine cranking
- Machine movement if safety systems are bypassed
- Fire
It may also bypass neutral-safety, clutch, or start-interlock circuits.
A multimeter, test light, remote starter switch used according to an approved service procedure, or controlled bench test provides better diagnostic information with less risk.
For DIY diagnosis, we recommend testing the circuit rather than intentionally shorting starter terminals with a metal tool.
How to Bench Test a Starter Solenoid
If the starter assembly has been removed, an off-vehicle bench test can help confirm an internal problem.
However, a starter motor can produce very high torque and current even when it is not installed in the machine.
Secure the starter firmly before applying power.
Before Bench Testing
Confirm:
- Starter voltage: 12V or 24V
- Correct terminal identification
- Correct polarity
- Appropriate test battery or power source
- Starter is securely restrained
- Test cables are correctly sized
Never energize an unidentified terminal.
Solenoid Engagement Test
When the correct start terminal is energized, the solenoid should normally produce a strong mechanical movement.
On a starter-mounted solenoid, the pinion or drive mechanism should typically move toward the engaged position.
Failure to move can indicate:
- Open solenoid winding
- Mechanical binding
- Damaged plunger
- Internal starter fault
Main Contact Test
With the solenoid de-energized, the main high-current contacts should normally be open.
When the solenoid is correctly energized, those contacts should close and connect battery power to the starter motor.
The most meaningful test is not simply whether the contacts show continuity, but whether they can carry current without excessive resistance.
Burned contacts can sometimes show electrical continuity on a low-current meter test but perform poorly under starter load.
Solenoid Resistance Test
Do not assume that every healthy starter solenoid should produce the same resistance reading.
Starter solenoids may contain different pull-in and hold-in winding designs, and resistance specifications vary considerably between starter models.
If measuring coil resistance, compare the reading with the manufacturer's specification for the exact starter or solenoid.
Avoid generic claims such as:
“Every good starter solenoid should measure 20–60 ohms.”
That value is not universally applicable.
How to Test a 12V Starter Solenoid
For a 12V system, begin by verifying that the battery is properly charged.
The diagnostic sequence is:
- Check battery condition.
- Check positive and negative cables.
- Verify battery voltage at the starter B+ terminal.
- Verify the S terminal receives the start signal.
- Check solenoid output.
- Perform voltage-drop tests.
- Check the starter motor if voltage delivery is correct.
Do not diagnose a solenoid based on battery voltage alone.
The voltage measured during cranking will depend on battery condition, temperature, starter current draw, cable condition, and engine load.
How to Test a 24V Starter Solenoid
Many trucks, excavators, wheel loaders, generators, and other heavy-duty machines use 24V starting systems.
The diagnostic logic is essentially the same as for a 12V system:
Battery bank → cables → B+ supply → S signal → solenoid → starter motor → ground
However, the expected voltage values are different.
Before testing:
- Confirm the system is actually 24V.
- Check whether two 12V batteries are connected in series.
- Confirm starter voltage from the identification label.
- Check the service manual.
- Use a meter rated for the circuit being tested.
Do Not Apply 12V Specifications to a 24V System
This is an important point for heavy-equipment diagnosis.
If the machine uses a 24V starter, do not compare the S-terminal or cranking voltage directly with passenger-car 12V specifications.
Likewise, replacement starter and solenoid voltage must match the electrical system.
Installing the wrong-voltage starter can cause immediate damage or prevent proper operation.
Starter Solenoid vs. Starter Relay: What's the Difference?
A starter relay and starter solenoid are related components, but they usually perform different jobs.
Starter Relay
The starter relay typically operates in the lower-current control circuit.
It receives a start command from the ignition switch, control module, or start button and sends power to the starter solenoid.
Starter Solenoid
The starter solenoid switches the high-current battery connection to the starter motor.
On many starter assemblies, the solenoid also mechanically moves the starter drive into engagement with the flywheel.
This difference matters during diagnosis.
If the S terminal on the solenoid does not receive a start signal, the problem may be the starter relay or control circuit, not the solenoid.
If the S terminal receives the correct signal but the solenoid does not operate correctly, the solenoid becomes a stronger suspect.
Bad Battery vs. Bad Solenoid vs. Bad Starter
These components frequently produce similar symptoms.
| Symptom | Battery | Solenoid | Starter Motor |
|---|---|---|---|
| Rapid clicking | Very likely | Possible | Less likely |
| One strong click | Possible | Likely | Likely |
| No click | Possible | Possible | Less likely |
| Slow cranking | Very likely | Possible | Likely |
| Lights dim heavily when starting | Likely | Possible | Likely |
| Correct S signal but no solenoid operation | Unlikely | Likely | Less likely |
| Correct power at starter motor but no rotation | Possible under load | Less likely | Likely |
| High voltage drop across solenoid | Unlikely | Likely | Unlikely |
| Intermittent hot-start problem | Possible | Possible | Likely |
This table should be used as a diagnostic guide, not an absolute rule.
The correct diagnosis comes from measurements.
Common Starter Solenoid Testing Mistakes
1. Replacing the Solenoid Because It Clicks
A click proves only that some solenoid movement occurred.
It does not prove that the main contacts are good.
2. Replacing the Solenoid Because It Does Not Click
If the S terminal never receives a start signal, even a new solenoid will not operate.
Always test the control circuit.
3. Ignoring the Battery
Starter systems require extremely high current.
A battery can operate lights and accessories normally yet still fail when the starter is engaged.
4. Checking Voltage but Not Voltage Drop
Seeing “12 volts” on an unloaded circuit does not mean the circuit can deliver starter current.
High-resistance cables may show normal voltage until load is applied.
5. Ignoring the Ground Side
Technicians often inspect only the positive cable.
The starter ground path is equally important.
6. Using 12V Values on 24V Equipment
This can produce completely incorrect conclusions.
Always identify system voltage first.
7. Measuring Resistance on a Live Circuit
Never use resistance or continuity mode on a powered starter circuit.
Disconnect power according to the proper service procedure first.
8. Assuming Every Solenoid Has the Same Resistance
Solenoid winding specifications vary.
Use the exact starter or solenoid manufacturer's specifications.
Can a Starter Solenoid Be Repaired?
It depends on the design.
Some older and heavy-duty starter solenoids can be disassembled and rebuilt with replacement contacts, plungers, or repair kits.
Other units are sealed or integrated into the starter assembly and are normally replaced rather than repaired.
Before ordering a replacement, identify:
- Starter manufacturer
- Starter model
- OEM part number
- Solenoid part number if available
- System voltage
- Number and arrangement of terminals
- Mounting design
- Equipment model
- Engine model
Matching by appearance alone is risky.
When Should You Replace the Starter Solenoid?
Replacement becomes reasonable when testing confirms that:
- The battery is healthy.
- Battery cables and grounds have acceptable voltage drop.
- Correct battery voltage reaches the starter.
- The S terminal receives the correct start signal.
- The solenoid fails to engage consistently, or
- The solenoid engages but fails to pass sufficient current to the starter, or
- Excessive voltage drop exists across its main contacts.
If correct voltage reaches the starter motor but the motor does not rotate normally, replacing only the solenoid may not solve the problem.
The starter motor itself should then be tested.
When searching for a replacement starter or starter solenoid, use the OEM number stamped on the original component whenever possible. OEM-number matching is generally more reliable than purchasing based only on machine appearance.
Browse the starter motor category to match voltage, mounting style, and OEM number before you order.
Frequently Asked Questions
How do I know if my starter or starter solenoid is bad?
Check the battery and cables first. Then verify the starter solenoid receives a proper start signal. If the solenoid receives the signal but does not send sufficient power to the starter motor, the solenoid is a strong suspect. If full voltage reaches the starter motor but the starter still does not operate, the starter motor or mechanical system is more likely at fault.
Can a starter solenoid click and still be bad?
Yes. The electromagnetic coil may move the solenoid plunger and produce a click while the internal high-current contacts remain burned, worn, or resistive. A voltage-drop test across the solenoid contacts is more useful than relying on sound alone.
What does one click but no crank mean?
One strong click usually means the solenoid received a start command. Possible causes include worn solenoid contacts, a faulty starter motor, weak battery, bad battery cable, or poor ground. Test the circuit before replacing the solenoid.
What causes rapid clicking when trying to start?
Rapid clicking commonly occurs when system voltage drops too far under starter load. Check battery charge, battery condition, terminals, positive cables, and ground connections first.
Can I test a starter solenoid while it is still installed?
Yes. In-vehicle testing is often preferable because it allows you to measure the circuit under real operating load. You can check the B+ terminal, S terminal, solenoid output, positive cable voltage drop, and ground-side voltage drop without removing the starter.
How many volts should a starter solenoid receive?
The start-signal terminal should normally receive voltage close to the electrical system voltage while the start command is active. Exact acceptable voltage depends on the vehicle, starter design, circuit configuration, and whether the system is 12V or 24V. Refer to the service specification whenever available.
Is a starter relay the same as a starter solenoid?
Usually not. A starter relay normally switches the lower-current starter-control circuit, while the starter solenoid switches high battery current to the starter motor and may also move the starter drive mechanically.
Can a weak battery damage a starter solenoid?
Repeated low-voltage starting attempts can cause excessive clicking, arcing, heat, and wear in starter-system components. Maintaining batteries and cable connections helps reduce unnecessary stress on both the solenoid and starter.
How do you test a starter solenoid without removing it?
Check battery voltage, voltage at the B+ terminal, voltage at the S terminal while starting, voltage at the starter-motor output, and voltage drop across the solenoid and battery cables. These tests can usually determine whether the solenoid is functioning without removing the starter.
How do you test a 24V starter solenoid?
The diagnostic procedure is similar to a 12V system, but all voltage readings must be interpreted according to the 24V system and equipment manufacturer's specifications. Confirm the machine voltage before testing or ordering replacement parts.
Does a bad starter solenoid always click?
No. A solenoid with an open coil, mechanical failure, missing ground, or other internal fault may produce no sound at all. However, a no-click condition can also result from a control-circuit problem, so verify voltage at the S terminal before replacing the solenoid.
Can a bad ground make the starter solenoid look faulty?
Yes. A poor engine or starter ground can cause slow cranking, clicking, intermittent starting, and voltage loss. Always include a ground-side voltage-drop test when diagnosing a starter problem.
Final Diagnosis
Testing a starter solenoid correctly is less about listening for a click and more about following the electrical circuit logically.
Start with the battery.
Then check:
Battery condition → Cables and grounds → Starter B+ voltage → Start-signal voltage → Solenoid output → Voltage drop → Starter motor
If the battery and cables are good, the solenoid receives the correct start command, but it cannot reliably transfer battery power to the starter motor, the starter solenoid is likely faulty.
If the start signal never reaches the solenoid, troubleshoot the control circuit instead.
If proper voltage reaches the starter motor but the motor does not operate correctly, investigate the starter itself.
This systematic approach is faster and more reliable than replacing parts based only on symptoms.
Need a Replacement Starter Motor or Starter Solenoid?
MOZAutoParts supplies replacement starting-system components for excavators, tractors, trucks, loaders, generators, forklifts, skid steers, and other equipment.
For the most accurate match, search using the OEM or reference number stamped on your original starter or solenoid.
Shop starter motors by OEM number, voltage, and equipment type.
If you are unsure about compatibility, compare the original part number, voltage, engine model, equipment model, mounting arrangement, and terminal configuration before ordering.